by
by Advanced Ads – Ad Manager & AdSense Plugin for WordPress: A Comprehensive Guide
Advanced Ads is a powerful and versatile ad management plugin for WordPress, designed to simplify ad placement and maximize revenue from advertisements. Created by Thomas Maier, Advanced Ads has gained popularity among WordPress site owners for its robust feature set and ease of use. Whether you’re a publisher managing ads across multiple platforms, a blogger monetizing a site, or a small business trying to optimize ad revenue, Advanced Ads can help streamline the process. It’s compatible with Google AdSense, as well as custom ads, affiliate banners, and even advanced ad networks, making it suitable for beginners and experienced webmasters alike.
1. Introduction to Advanced Ads
The Advanced Ads plugin serves as a full ad management suite within WordPress, helping users create, display, and control ads on their websites. It’s particularly useful for those who use Google AdSense but need more flexibility and targeting options than what AdSense offers by default. Advanced Ads integrates with AdSense and other ad networks, offering features like ad rotation, ad targeting, ad scheduling, and more. The plugin’s intuitive interface and compatibility with major WordPress themes and plugins have made it a top choice for anyone wanting to monetize their website.
2. Key Features of Advanced Ads
Advanced Ads comes packed with numerous features designed to help users manage ads effectively and efficiently. Here’s an overview of some of the plugin’s most popular features:
a. Ad Placement Options
The flexibility of ad placements is a significant highlight of Advanced Ads. It allows users to place ads almost anywhere on their site, including in posts, sidebars, headers, footers, and even in between paragraphs within content.
- Automatic Placements: Users can define specific rules to place ads automatically in pre-set locations across the site.
- Manual Placements: Through shortcodes or widgets, users can manually place ads in specific areas where they want the ads to appear.
- Ad Injection within Content: For more advanced users, the plugin offers options to insert ads between specific paragraphs or at particular points within articles.
b. Google AdSense Integration
Advanced Ads offers seamless integration with Google AdSense, making it easy for publishers to connect their AdSense account and automatically import ads. It provides additional options that aren’t available directly within AdSense, such as advanced targeting, ad rotation, and placement control.
- AdSense Ad Importing: Users can quickly connect their AdSense account and import ads to the site, without needing to insert AdSense code manually.
- Ad Blocker Detection: The plugin includes an ad-blocker detection feature to counteract ad-blocking software, ensuring users maximize their AdSense revenue.
c. Advanced Targeting Options
Advanced Ads allows users to control where and when ads are shown, helping to target specific users and optimize ad revenue. Targeting options can be customized based on a range of criteria:
- Device Targeting: Display different ads on mobile, desktop, or tablet devices.
- Visitor Location: Target ads by user location, which is particularly useful for advertisers running regional campaigns.
- User Roles: Show ads only to certain user roles (e.g., ads can be disabled for logged-in users or shown only to visitors).
- Content-Based Targeting: Target ads based on specific post types, categories, or tags to ensure relevant ad placements that improve user engagement and click-through rates.
d. Ad Rotation and Scheduling
To keep ad content fresh and relevant, Advanced Ads includes ad rotation and scheduling features. These allow for the rotation of different ads in a single placement and setting time restrictions for specific ads.
- Ad Rotation: Rotate multiple ads in a single ad slot to test various creatives or reduce ad fatigue.
- Scheduling: Set start and end dates for each ad, ideal for time-sensitive promotions, seasonal ads, or A/B testing campaigns.
e. Responsive Ads and AMP Support
Advanced Ads supports responsive ads, ensuring that they look good on all device types and screen sizes. This feature is essential for maintaining a user-friendly experience, especially on mobile devices.
- Responsive Design: Ads automatically adjust based on the screen size, so users have a seamless experience across devices.
- AMP Compatibility: Advanced Ads also supports AMP (Accelerated Mobile Pages) for users who want faster-loading pages optimized for mobile.
3. Benefits of Using Advanced Ads
Advanced Ads offers several benefits that make it a valuable tool for anyone looking to monetize their WordPress website effectively:
a. Simplified Ad Management
Advanced Ads provides an all-in-one solution to managing multiple ads across different ad networks. Users can manage all ads from a central dashboard, making it easy to keep track of ad placements, rotations, and performance.
b. Increased Ad Revenue Potential
With Advanced Ads’ advanced targeting options, users can display ads in ways that maximize visibility and engagement. By rotating ads, targeting specific users, and optimizing placements, site owners can boost their ad revenue over time.
c. Enhanced User Experience
The plugin’s targeting features ensure ads are shown only to relevant users, which can reduce ad fatigue and improve user engagement. Displaying ads based on user behavior, device type, or location keeps the user experience positive by making ads less intrusive and more relevant.
d. Compatibility with Different Ad Networks
While the plugin works well with Google AdSense, it’s also compatible with other ad networks, custom HTML ads, and affiliate banners. This flexibility allows site owners to diversify their revenue streams.
4. How to Set Up and Use Advanced Ads
Setting up Advanced Ads on a WordPress website is straightforward. Here’s a step-by-step guide to help you get started with the plugin:
Step 1: Install and Activate the Plugin
To begin, go to the WordPress dashboard, navigate to Plugins > Add New, and search for “Advanced Ads.” Click “Install” and then “Activate” to start using the plugin.
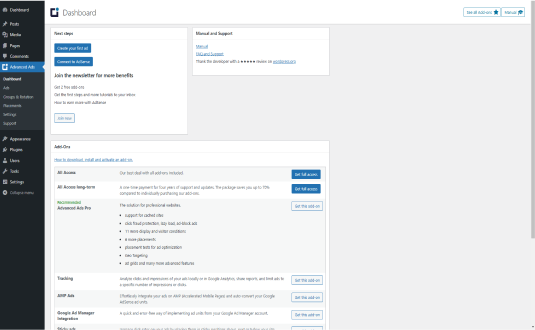
Step 2: Configure Basic Settings
Once activated, the plugin adds a new “Advanced Ads” section to the WordPress admin menu. Go to Advanced Ads > Settings to configure basic options, such as cache-busting, ad injection settings, and display options.
Step 3: Create Your First Ad
To create an ad, go to Advanced Ads > Ads and click on “New Ad.” Here, you can enter the ad’s name, choose an ad type (e.g., AdSense, custom HTML, or image), and configure any additional settings specific to that ad type.
Step 4: Define Ad Placement
After creating the ad, you need to define where it will be displayed. Advanced Ads provides multiple placement options, including automatic placements (e.g., within content, before/after post content, header, footer) and manual placements (via shortcodes or widgets).
Step 5: Set Targeting and Scheduling
If desired, go to the Targeting and Scheduling options for each ad to customize who will see the ad, on which devices, and during which times. These settings allow for maximum control over ad delivery.
Step 6: Preview and Publish the Ad
Once you’re satisfied with the ad configuration, you can preview it and make any final adjustments before publishing it on your site.
5. Advanced Ads Add-Ons and Extensions
Advanced Ads offers several add-ons to extend its functionality, enabling users to take their ad management to the next level. Here are some of the most popular add-ons:
a. Advanced Ads Pro
The Advanced Ads Pro add-on enhances the plugin with additional features, including more placement options, visitor conditions, and priority settings for ad display.
b. Ad Tracking
The Ad Tracking add-on provides detailed statistics on ad impressions and clicks, enabling users to analyze performance and optimize their ads.
c. Selling Ads
For users who want to sell ad space directly on their websites, this add-on offers tools for creating ad packages, handling transactions, and managing advertisers.
d. Sticky Ads
The Sticky Ads add-on allows users to create “sticky” ads that stay in place as users scroll through the page. This can help increase ad visibility without disrupting the user experience.
6. Ideal Use Cases and Best Practices
a. Ad Optimization for High-Traffic Blogs
For bloggers and publishers with significant traffic, Advanced Ads offers advanced targeting and rotation options that help maximize ad performance, particularly when managing multiple ad networks.
b. Local Businesses Targeting Regional Audiences
Local businesses can use Advanced Ads’ location-based targeting to show ads to visitors from specific regions. This ensures the right audience sees ads, increasing the effectiveness of promotional campaigns.
c. Affiliate Marketing Sites
Affiliate marketers can use Advanced Ads to display affiliate banners in strategic locations throughout their site. With scheduling and rotation, they can test various affiliate products and optimize based on performance.
7. Alternatives to Advanced Ads
While Advanced Ads is highly versatile, there are other ad management plugins available for WordPress:
- Ad Inserter: Another popular option for ad management, Ad Inserter supports a wide range of ad networks and allows for customizable ad placements.
- WP Pro Advertising System: This premium plugin offers a similar range of features and is geared towards users looking for a professional ad management system.
- Google Site Kit: While not as feature-rich as Advanced Ads, Google Site Kit integrates AdSense data directly into WordPress, making it a suitable option for basic AdSense users.
8. Conclusion
Advanced Ads is a comprehensive ad management plugin for WordPress, offering powerful features for both beginner and advanced users. Its extensive range of targeting, scheduling, and placement options gives users the control they need to optimize ad revenue effectively. For website owners serious about monetizing their WordPress site, Advanced Ads provides an invaluable toolset for managing ads with ease and precision.