 by
by Code Snippets WordPress Plugin: A Comprehensive Guide
The Code Snippets plugin for WordPress is a powerful and versatile tool for adding custom code to your website without the need to modify theme files directly. For WordPress developers and website administrators, the plugin provides an easy way to enhance or customize the functionality of a site by inserting PHP, CSS, or JavaScript code snippets in a safe, user-friendly interface. This eliminates the need for creating or modifying child themes or dealing with complex files like functions.php.
In this comprehensive guide, we’ll explore what the Code Snippets plugin is, its features, how to use it effectively, and some best practices to ensure you get the most out of this valuable tool.
What is the Code Snippets Plugin?
The Code Snippets plugin for WordPress enables you to add custom code to your WordPress site without directly editing theme or plugin files. It provides a simple interface within the WordPress admin dashboard where users can easily add, manage, and run custom PHP, CSS, and JavaScript snippets. This is particularly helpful for users who don’t want to tamper with core files or are uncomfortable editing their theme’s functions.php file.
Rather than making changes directly to your theme, which could be overwritten during updates, the Code Snippets plugin allows you to add code that persists even if you switch themes. Additionally, it helps you manage and troubleshoot code snippets in a more organized and secure manner.
Key Features of the Code Snippets Plugin
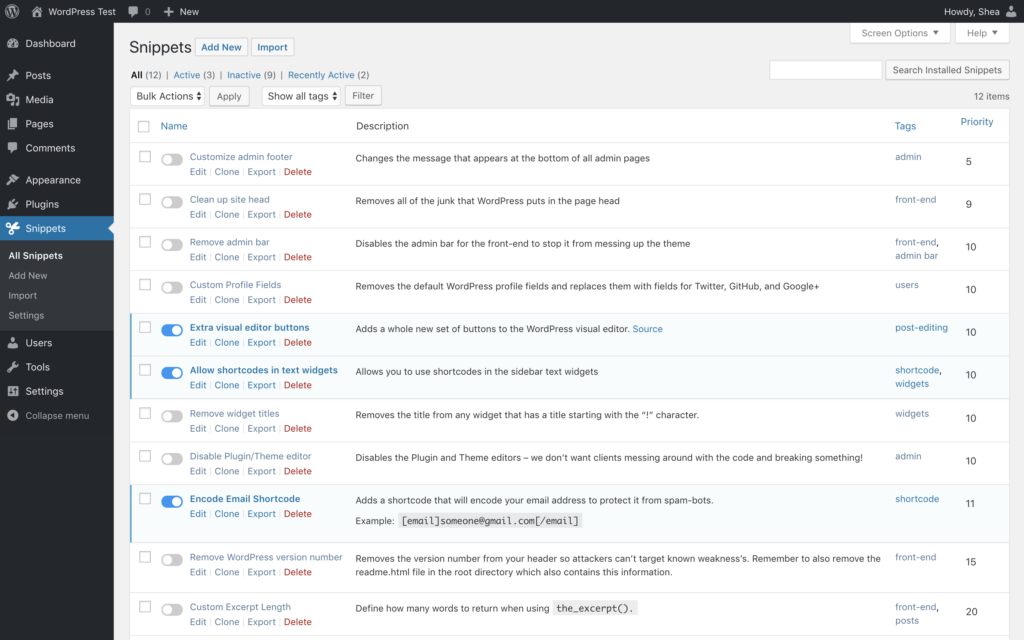
- Easy Code Management: The Code Snippets plugin provides a centralized interface for managing all your code snippets. Each snippet is listed with a title and description, making it easy to find and update any piece of code. You can also see whether a snippet is active or inactive.
- Adding Snippets: You can add custom PHP code directly through the plugin’s interface. For users who aren’t familiar with PHP, this feature still works seamlessly by ensuring that snippets are automatically inserted into the right part of your site. You don’t need to worry about adding
<?phpor?>tags manually. - Error Handling: The plugin provides error handling by disabling any problematic snippets that break your site, so you can easily troubleshoot. If a snippet causes an issue or PHP error, the plugin will automatically deactivate it, preventing the site from crashing.
- Import and Export Functionality: Code Snippets allows you to export your saved snippets as a .json file, which can then be imported into another WordPress site. This is particularly useful for developers who need to move snippets between different sites or share their code with others.
- Code Categories: You can organize snippets into categories for better management. This is helpful if you have numerous code snippets for different purposes, such as SEO, performance optimization, design tweaks, etc.
- Run Snippets on Specific Pages: For more advanced users, the plugin allows you to choose where and when to run snippets. You can restrict snippets to specific post types, user roles, or pages, giving you more control over the functionality of your site.
- No Theme or Plugin Dependencies: Unlike adding code directly to your theme’s
functions.phpfile, the Code Snippets plugin allows the code to remain intact regardless of theme changes. This means you can switch themes without worrying about losing your custom code. - Snippet Activation: Snippets can be activated or deactivated with a single click, allowing for quick changes or testing without needing to delete code. If you encounter a problem with a snippet, you can disable it to restore your website’s functionality.
How to Use the Code Snippets Plugin
Step 1: Installing the Plugin
- Go to the WordPress Dashboard: In your WordPress admin dashboard, navigate to
Plugins > Add New. - Search for Code Snippets: In the search bar, type “Code Snippets” and press Enter. The plugin should appear in the search results.
- Install and Activate: Click Install Now next to the plugin and then click Activate once it’s installed.
Step 2: Adding a New Snippet
Once the plugin is installed and activated, you’ll see a new menu item in the left sidebar called Snippets.
- Go to Snippets: Click on
Snippets > Add Newto open the snippet editor. - Enter Your Code: You can add your PHP, JavaScript, or CSS code directly into the code editor. The editor supports syntax highlighting to make the code more readable.
- Give the Snippet a Name: Each snippet needs a name and description for easy identification. This will help you organize and manage your snippets, especially if you have many.
- Set Execution Rules: You can select where you want your snippet to run:
- Run Everywhere: Runs the code on all pages.
- Only on the Frontend: Executes only on the frontend of your website, not in the admin panel.
- Only in the Admin Area: Runs the snippet only within the WordPress dashboard.
- Only on Specific Pages: You can restrict the snippet to only certain pages, posts, or post types.
- Save and Activate: Once your snippet is ready, click Save Changes and Activate. The snippet will now be active on your site.
Step 3: Managing Your Snippets
- View Active Snippets: After adding snippets, you’ll see a list of all your snippets under
Snippets > All Snippets. Here, you can edit, deactivate, or delete them. - Deactivate/Reactivate: To temporarily disable a snippet, click on the “Deactivate” link next to the snippet. You can always reactivate it later.
- Edit or Delete Snippets: If you need to modify a snippet, click Edit to make changes. To remove a snippet entirely, click Delete.
Step 4: Troubleshooting and Debugging
If a snippet causes issues, such as breaking your site, the plugin will automatically deactivate the problematic snippet to prevent errors. This feature can save you from dealing with a site crash or breaking functionality.
- Error Logging: The plugin also includes error logs that allow you to debug any issues that arise from the snippets.
Best Practices for Using the Code Snippets Plugin
- Backup Your Site: Before adding complex code snippets to your website, make sure to create a backup. Even though the Code Snippets plugin provides a safe environment, errors can still occur, and backups will ensure you can quickly restore your site.
- Test Code in a Staging Environment: If you’re adding new functionality, it’s always a good idea to test your snippets on a staging site first. This allows you to catch any potential conflicts or issues without affecting the live site.
- Keep Snippets Organized: As your site grows, so may the number of snippets you add. Take advantage of the categories feature to organize your snippets by type (e.g., SEO, performance, design tweaks).
- Disable Snippets When Not in Use: If you don’t need a specific snippet at the moment, deactivate it. This is a good habit, especially when running snippets for testing purposes. Deactivating them ensures there’s no unnecessary code running on your site.
- Document Your Snippets: Add clear titles and descriptions to your snippets, so you know exactly what each one does. This is particularly helpful if you’re working in a team or if you return to the site after a long time.
Conclusion
The Code Snippets plugin for WordPress is an indispensable tool for developers, site administrators, and anyone looking to extend their site’s functionality without dealing with the complexities of theme files or custom development. Its simple interface, error handling, and flexibility make it an excellent choice for safely adding custom code to WordPress websites.
Whether you’re adding a small PHP tweak, modifying CSS styles, or running JavaScript to enhance user interaction, the Code Snippets plugin allows you to implement and manage your custom code with ease. By following best practices and maintaining organized snippets, you can ensure that your WordPress site runs smoothly, efficiently, and remains free from unnecessary code bloat.